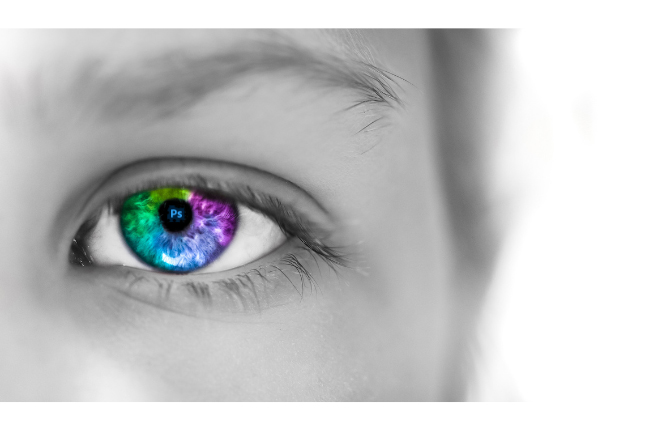
The Healing Brush Tool is a powerful and versatile tool in Photoshop and Lightroom that allows you to retouch and repair image imperfections. In this tutorial, we’ll walk you through how to use the Healing Brush Tool in Photoshop and Lightroom, covering everything from basic concepts to advanced techniques.
Before we dive into the tutorial, let’s first look at the Healing Brush Tool and how it differs from other retouching tools in Photoshop and Lightroom.
What is the Healing Brush Tool?
The Healing Brush Tool is a retouching tool that allows you to sample pixels from one area of an image and use them to “heal” or repair another area. It’s similar to the Clone Stamp Tool. Still, unlike the Clone Stamp Tool, which copies pixels from one place to another, the Healing Brush Tool analyzes the texture, lighting, and shading of the sampled pixels and adjusts them to match the target area.
Where Do I Find Healing Brush Tool In Photoshop?
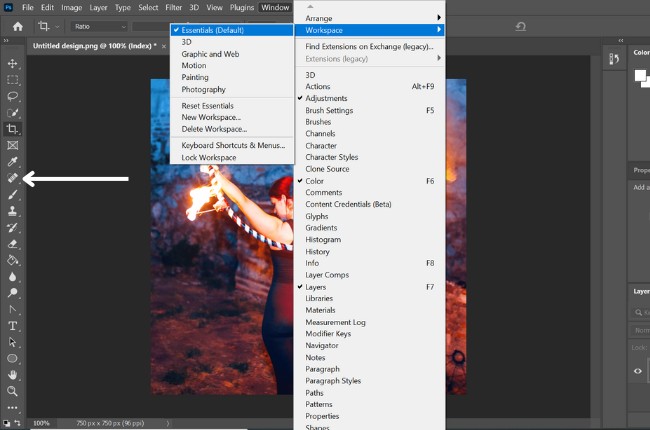
In Photoshop, you can find the healing brush tool on the left sidebar about right in the middle. If you have no side bar, go into Window, Workspace and select Essentials (Default).
How to Use the Healing Brush Tool In Photoshop
You can use the Healing Brush Tool for all different types of tasks, but mainly it’s used for getting rid of unwanted pixels. Most people use the brush to eliminate skin or surface imperfections. It also is used to get unwanted items deleted from photos.
Step 1: Select the Healing Brush Tool
To select the Healing Brush Tool in Photoshop, you can either click on the Healing Brush Tool icon in the toolbar or press the (J) key on your keyboard.
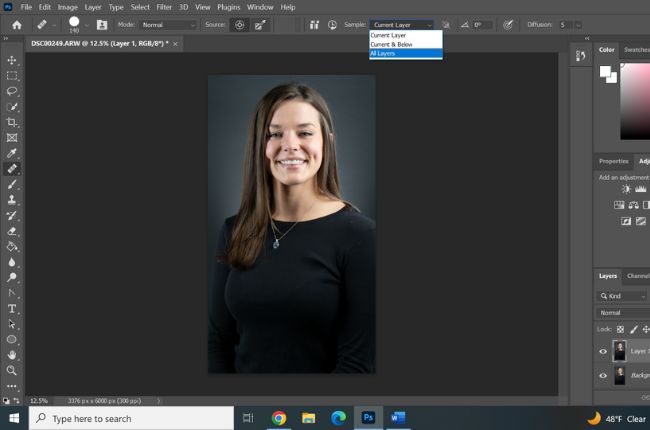
Step 2: Set the Sampling Options
Before you start using the Healing Brush Tool, it’s essential to set the sampling options correctly. To do this, right-click (Windows) or Control-click (Mac) on the Healing Brush Tool icon in the toolbar and select “Sample All Layers” from the context menu. Selecting all layers will allow you to sample pixels from any layer in the image, not just the active layer.
Step 3: Select the Source Area
To do this, press and hold down the Alt key (Windows) or Option key (Mac) and click on the image area you want to sample.
Step 4: Adjust the Brush Size and Hardness
To adjust the brush hardness, use the Brush Hardness slider in the Options bar or the [Shift +] or [Shift – ] keys on your keyboard to increase or decrease the brush hardness. Keyboard shortcuts to adjust the size of the brush ( [ ) to make it smaller and ( ] ) to make it bigger.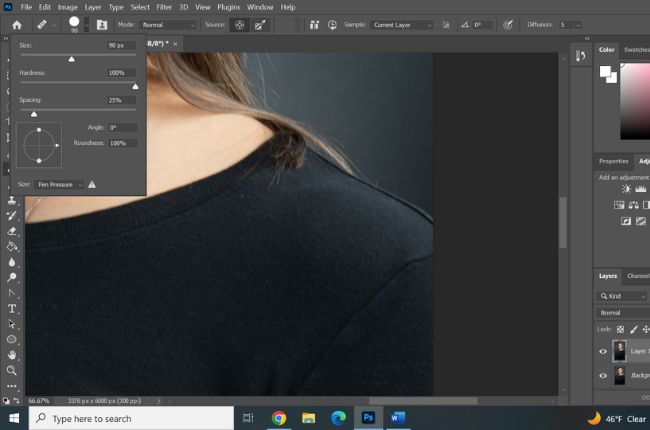
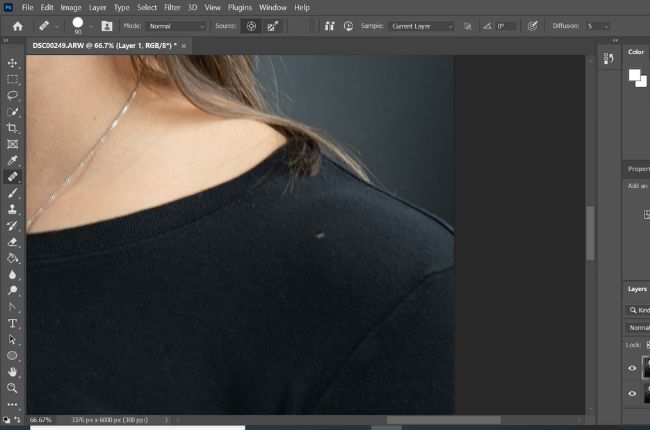
Step 5: Paint Over the Target Area.
With the source area selected, paint over the target area with the Healing Brush Tool to apply the sampled pixels. As you paint, the Healing Brush Tool will analyze the sampled pixels’ texture, lighting, and shading and adjust them to match the target area. In the photo we have a spot on the sweater that’s unwanted and the necklace.
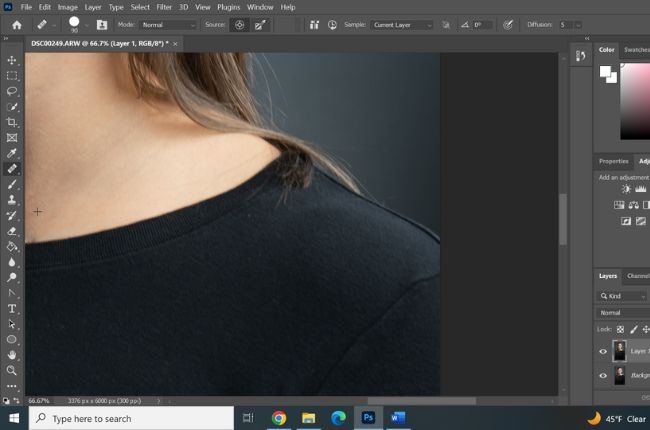
Results After the Healing Brush Tool
As you can see the Healing Brush Tool did a great job on the small spot on the shoulder. The reason why that works so great is because the pixels around it are pretty much all the same so its not hard for the software to correct this. The necklace on the other hand being a larger item and in a different area still got removed but didn’t match up the skin tones perfectly.
How to Adjust the Healing Brush Tool in Photoshop
Here are some key settings you can adjust to have more control. Adjusting these setting allows you to customize the Healing Brush Tool to suit your specific needs and achieve the desired results.
Brush: You can choose the size and shape of the brush cursor, as well as the hardness (the transition between the brush edge and the center).
Source: This setting allows you to specify the area that the Healing Brush Tool will use to “heal” the target area. You can choose a specific point by Alt/Option-clicking on it or use the “Current & Below” or “Sampled” options to automatically sample from the active layer or multiple layers.
Mode: This setting determines how the Healing Brush Tool will blend the healed pixels with the rest of the image. You can choose from various blend modes, such as Normal, Lighten, Darken, and Overlay.
Opacity: This setting allows you to control the transparency of the healed pixels from 0% (fully transparent) to 100% (opaque).
Aligned: If this option is checked, the Healing Brush Tool will continually sample from the same source point as you move the cursor around the image. If it is not checked, the tool will sample from a new source point each time you use it.
Blending Modes for the Healing Brush Tool
Use the Normal blend mode for most retouching tasks. This blend mode replaces the target area pixels with the pixels from the source point without any blending or color changes.
Experiment with different blend modes to achieve creative effects. For example, the Overlay blend mode will boost the contrast and saturation of the healed pixels, while the Soft Light blend mode will add a subtle, glowing effect.
Use the Blend sliders in the Layer Style dialog box to fine-tune the blending of the healed pixels. This can be especially useful when you want to blend the healed pixels more seamlessly with the underlying pixels.
By experimenting with different blend modes and techniques, you can achieve a wide range of results with the Healing Brush Tool. Remember that using these tools carefully and sparingly is important, as overuse can lead to unrealistic or artificial-looking results.
If you can’t take care of the issue using the Healing Brush Tool then try the clone the Clone Stamp Tool, it allows you to sample from a specific point in the image and “clone” that point to another location without any blending or color changes. This can be useful for copying specific details or textures from one part of the image to another.
How to use the Healing Brush tool in Lightroom
The Healing Brush Tool is called Healing in Lightroom’s Develop module and it works similarly to the Healing Brush Tool in Photoshop.
Step 1: Select the Healing Icon
In the Develop module’s toolbar, select Healing. The Healing Brush also has different modes, Content Aware Removal and Clone Stamp, all can be used for different retouching tasks.
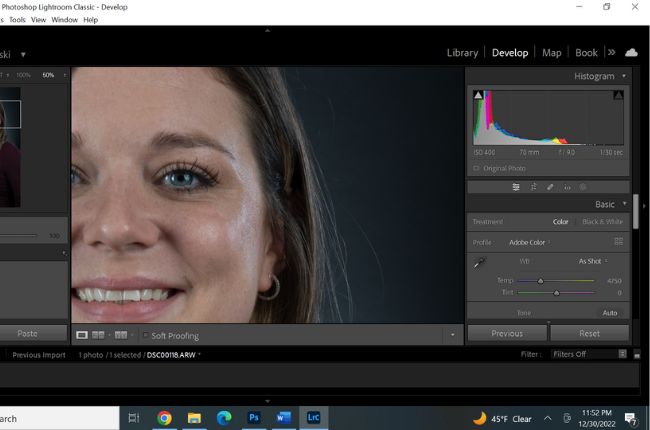
Step 2: Choose Mode
Pick the mode you want your brush to perform. For this picture we are going to pick the Content Aware Removal because we want the top of the ear to be covered by hair. Right under the mode you can set your brushes’ size and opacity.

Step 3: Select Area and Remove
Position the Healing Brush over the ear to “heal” the area. The Healing Brush Tool will automatically sample from a nearby area and blend the healed pixels with the surrounding pixels.
If you need to adjust the source point or the blend settings of the Healing Brush, you can do so by right-clicking on the blemish and selecting the “Edit” option. If you encounter a more complex photo with more details other tools might be needed.
Troubleshooting Common Issues With the Healing Brush Tool
Here are some common issues you may encounter when using the Healing Brush Tool and some suggestions for troubleshooting them:
Problem: The Healing Brush Tool is not blending smoothly with the surrounding pixels.
Solution: Select a different source point, adjust the blend mode and brush settings, or use the Clone Stamp Tool for more precise retouching.
Problem: The Healing Brush Tool leaves a halo or a visible seam around the repaired area.
Solution: This can happen if the Healing Brush Tool cannot match the texture and tone of the surrounding pixels. To fix this issue, try selecting a different source point, using a smaller brush size, or adjusting the brush’s feather and flow settings. Trying a different mode like the Content Aware Removal can produce a different result.
Problem: The Healing Brush Tool removes too much or not enough of the blemish: This can be caused by incorrect brush size, shape, blend mode, or opacity settings.
Solution: To fix this issue, try adjusting the brush size and shape, blend mode, and opacity settings until you achieve the desired result.
Problem: The Healing Brush Tool is taking a long time to process.
Solution: This can be caused by a large brush size, a complex blend mode, or a large or high-resolution image. To fix this issue, try using a smaller brush size or reducing the image size or resolution.
By troubleshooting these common issues, you should be able to use the Healing Brush Tool more effectively and achieve the desired results.
Bonus Tips and Tricks for Mastering the Healing Brush Tool
Remember that the Healing Brush Tool works best on minor, isolated blemishes and imperfections. You may need to use a combination of different retouching tools and techniques for larger areas or more complex issues.
Always work on a duplicate layer, that way you can go back and rework the area. If you don’t like the edit you can always delete the layer and try a different approach.
The Healing Brush Tool in Photoshop allows you to blend the healed pixels with the surrounding area using a variety of blend modes. Blend modes determine how the colors of the healed pixels will interact with the colors of the underlying pixels and can be used to achieve a wide range of creative effects.
Use a Wacom tablet or stylus for more precise control over the Healing Brush Tool. A tablet or stylus allows you to make more subtle adjustments to the brush cursor, which can be especially useful for fine details and edges.
The Clone Stamp Tool allows you to sample from a specific point in the image and “clone” that point to another location without any blending or color changes. This can be useful for copying specific details or textures from one part of the image to another.
Use the history panel to go back to previous steps in your editing workflow, this can be especially useful if you make a mistake or want to try a different approach.
Summary
Adobe’s Lightroom and Photoshop are a great tool to have as a photographer. Editing software can pretty much do anything, but making it look realistic is something that comes with practice. Whenever your editing pay attention to detail, that will separate a good edit from a bad one.
Just like anything you learn it take tome to get good at it. By mastering these tips and tricks, you can use the Healing Brush Tool more effectively and achieve more professional-looking results with your photos.